Wednesday, December 17, 2014

DIY Paper Antler Wreath

THIS POST IS SPONSORED BY TINY PRINTS. THANKS FOR SUPPORTING THIS PARTNERSHIP! ALL THOUGHTS AND OPINIONS ARE 100% MY OWN.

Create this fun and stylish antler wreath with your holiday card collection. 

40 Minutes
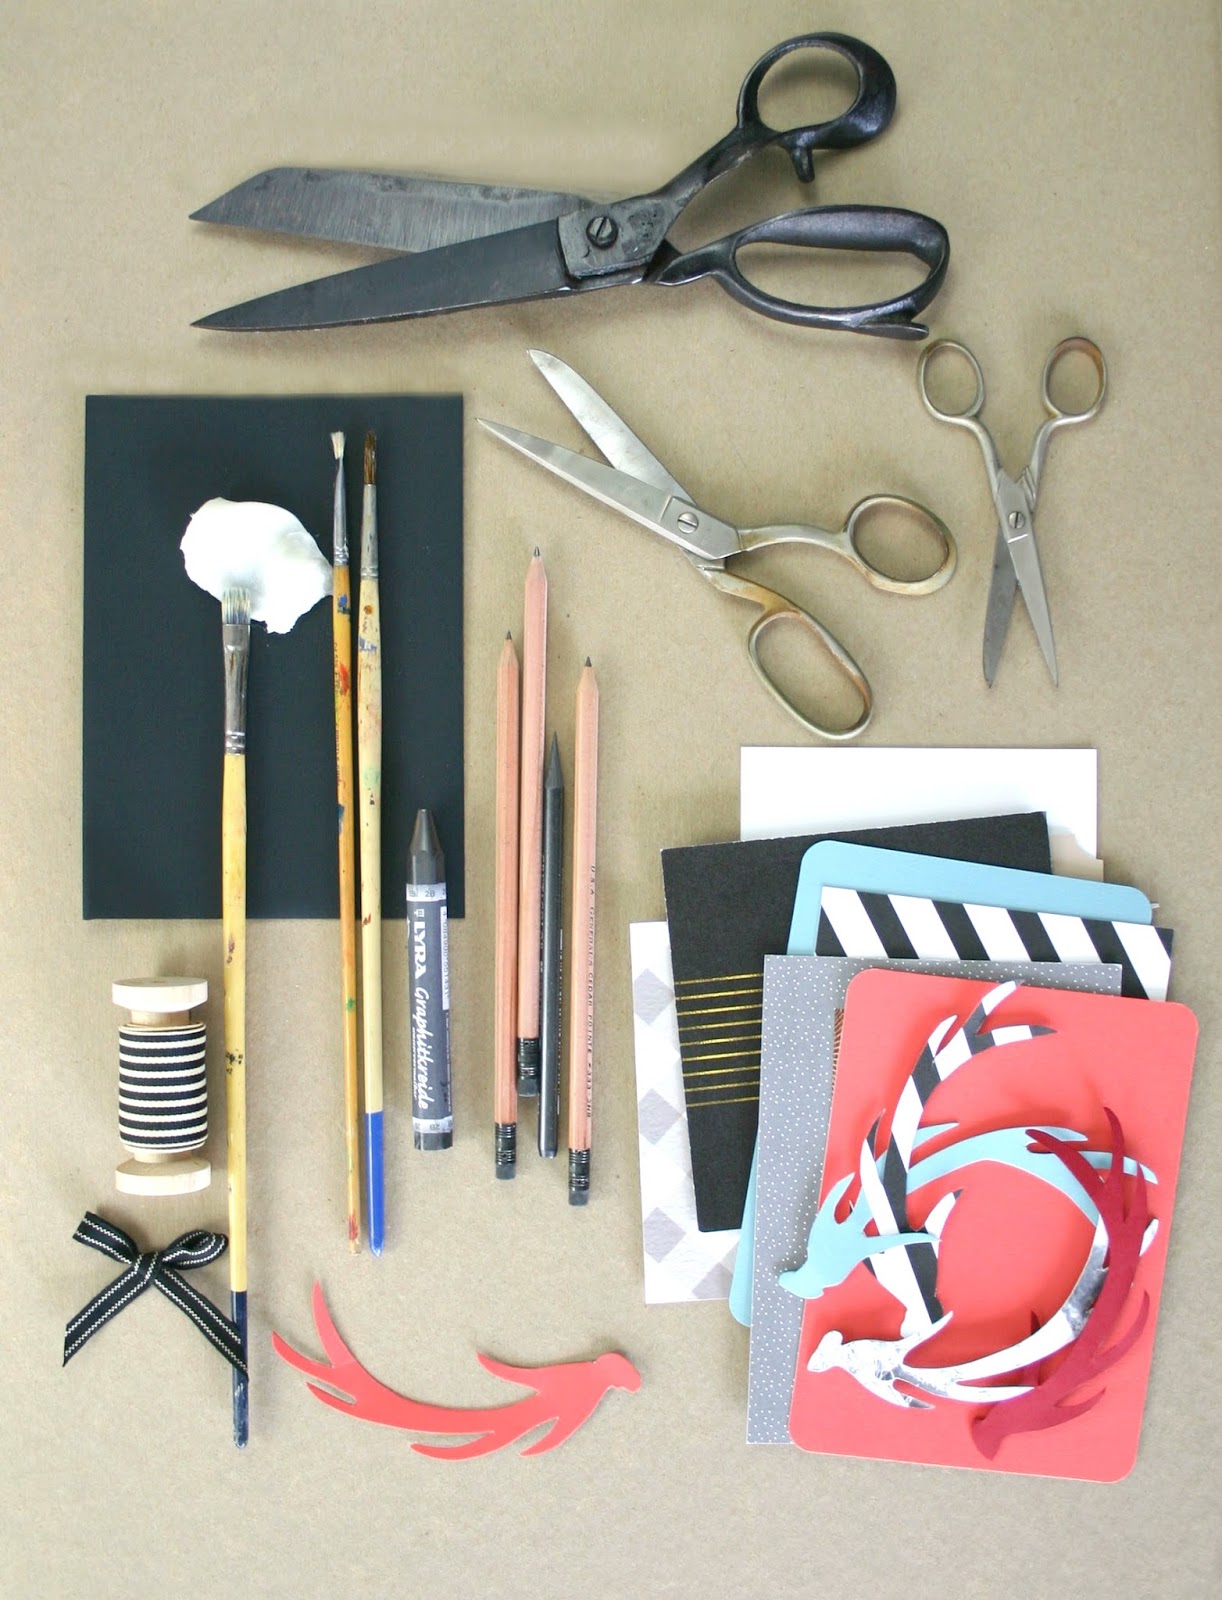
Gathered Holiday Cards
Yes Brand Paste
Paint Brush (for paste)
Pencil
Ribbon (about 1 ft)
Scissors
Antler Template (you can make your own or print and trace mine)

Inspiration for this project came from the joy of receiving such beautiful holiday cards this time of year and the frustration of being unable to find something fun to do with them after the holidays! This year we decided to host a crafternoon on New Year's Day and invite our friends and family over for some food, fun, and a little craftiness. I found these great invites over at Tiny Prints, and loved the antler motif so much, a DIY was born! 


To get started you will need to gather the supplies listed above. I encourage you to go ahead and purchase Yes Paste. I love this stuff. It is not well known, but it works beautifully with paper and a little bit will go a long way. I also recommend using sharp scissors. 


First you will want to create an antler template. I made mine by drawing a larger version of the antler shown on the crafternoon invitation. You may want to draw your own, or you can print out the photo below and size it to your liking, then trace with pencil onto card stock or a holiday card. Putting the card on top of your antler and placing them both over a sunny window works great to get an accurate tracing. When sizing your antler, keep in mind, the finished wreath as shown is 8 inches in diameter.


Once you have a template, you will trace it on top of your holiday cards, then cut. You will need to be sure to trace your template on both sides so you have finished antlers pointing in both directions. I used 10 antlers in my finished wreath. 


After you trace and cut your antlers you will need to prepare some paste. Put a very small amount on the tip of a short haired paint brush. As you lay out your antlers, brush a small amount of paste on the back of the top antler and lay it flat on to the bottom one. Work your way around switching from side to side into a circle.


The last step is to take your ribbon and tie a bow to paste in the middle. Brush a small amount of paste on the back of each loop of the bow and lay flat on the ends of the antlers at the bottom of the wreath. Allow your wreath to lay flat for about 2 hours or so. Yes Paste stays flexible for several hours and will need time to set. 


I hope you have as much fun making this wreath as I did. I'll be thinking of more fun ways to recycle those holiday cards. Let me know what clever projects you create with yours!

Wishing everyone a wonderful holiday and the happiest of New Year's. To great adventures!

xoxo

Lisa


Original photography, art direction + styling for Zelma Rose by Lisa Anderson Shaffer.


This post is sponsored by Tiny Prints. Thanks for supporting this partnership! All thoughts and opinions are 100% my own.


Monday, December 8, 2014

DIY FABRIC STATEMENT NECKLACE


I love a good DIY and this time of year a do it yourself project can not only yield a thoughtful gift, but can be a great opportunity to gather your friends and family together for a fun crafternoon. One of my favorite parts of being a creative entrepreneur in the Bay area is that there are so many wonderfully imaginative people to collaborate with. For this project I teamed up with my pal and fellow creative entrepreneur Madeline Trait. Madeline pulled together a great post of this DIY for Martha Stewart herself. You can check it out here.


Madeline and I formally met last year, but I had been a fan of her beautiful hand painted cake toppers for years. With a similar design aesthetic, attention to detail and love of laughter, Madeline and I became instant friends. We were searching for a project to work on together and when she told me about this incredible Marimekko fabric covered necklace she had, well it was easy to get inspired. With our love of vibrant prints leading the way, we created this fun DIY that in 90 minutes has you looking like a fashion forward, femme fatale.

YOU WILL NEED:

90 Minutes
Fabric at least 1 yard
Embroidery thread
Wooden Beads - We used 1" and 3/4" but you can choose any size you like.
Scissors
Needle
Iron


Step 1. 

Cut your fabric into strips. For 1" beads the fabric needs to be 2.5" wide. For the 3/4" beads the fabric needs to be 2" wide. All strips should be no shorter than 30". The length of the strip determines how long your necklace will be. 


Step 2. 

With a hot iron, create a 1/4" hem on both sides of your fabric strip.


Step 3.

This is the fun part! To add your first bead, find the center of your fabric strip by folding it in half length wise. Next place your first bead in the center of the fabric strip and wrap the fabric entirely around the bead. Once the bead is completely covered in fabric you will secure either end with embroidery thread. Put your needle through the fabric to secure it tight, wrap it around several times and then knot it at the end. You will repeat this step until all your beads are covered.


Step 4.

To finish the necklace, tie remaining loose fabric into knots and then knot both sides together. You can also cut the remaining loose fabric into 3 strips to braid and then knot at the end. We did both. 


Step 5.

Ready to wear!


Happy crafting!

xoxo

Lisa + Madeline

Original photography, art direction + styling for Zelma Rose by Lisa Anderson Shaffer

You can check out this project over on the Martha Stewart Blog here. We love you M...


Monday, November 24, 2014

The Homestead: Creating the Perfect Custom Gifts

This post is sponsored by Tiny Prints. Thanks for supporting this partnership! All thoughts and opinions are 100% my own.

With the holidays fast approaching, it's time to get started on your holiday gift list. With a little time off and a chance to get out with the family, I like to get a start on my holiday shopping around Thanksgiving.  This year I wanted to give my friends and family gifts that were not only useful, but also thoughtful and really personalized. Custom gifts have standout sentiment for any occasion and taking the time to create special personalized designs not only feels good, but looks good too! To inspire your gift giving this season, I pulled together 4 of my favorite custom gift ideas perfect for family and friends. All useful, stylish, and thoughtful, everyone will be enjoying these throughout the year!

Personalized Stationary

Give the Gift Personalized Stationary

My first favorite custom gift to give and receive is personalized stationary. I found the beautiful note cards above at Tiny Prints, and added some colorful card stock, pencils and ribbon to complete the set. 

Thank You Cards

Custom Thank You Cards


If there is one thing everyone can use this time of year, it's Thank You cards. I wanted to put a different spin on the standard thank you and found these personalized state greetings postcards. Each card can be customised with a different state and icons of your choice. I of course chose California, and added the heart over the Bay Area, along with our name. Add in some matching pencils and a few cute gift wrap items and you've got the perfect gift!

Kitchen Cook's Notebook

Kitchen Recipe Book

Notebooks make a great gift, especially for the busy family. This gift idea was inspired by my friends who like to spend their time on the kitchen. Notebooks can be particularly handy in the kitchen, for collecting recipes, writing down ingredients, taking cooking notes, and making grocery lists. I customized this colorful notebook with the new year and added some card stock envelopes and recipe cards that can be taped to the inside pages to hold notes and clippings. Two beautiful pencils and a few jingle bells later, and your gift is ready to wow! 

Hostess Gift

The Perfect Hostess Gifts

One of the best parts of the holiday season is parties! Bringing a personalized gift to the host or hostess makes an especially thoughtful gift. Consider forgoing the standard bottle of wine or candle this year and opt for a custom notepad and ornament.  I added the host's last name to the notepad above and chose a favorite location as the custom ornament. Remember, not all custom gifts need to be personalized with a family photo or name. Sometimes a shared joke or favorite quote makes a custom gift extra special. 


However you choose to celebrate this season, I wish you a wonderful week and a Thanksgiving filled with love and gratitude. And may you find time for just a little shopping :)

xoxo

Lisa


Original photography, art direction + styling for Zelma Rose by Lisa Anderson Shaffer.


This post is sponsored by Tiny Prints. Thanks for supporting this partnership! All thoughts and opinions are 100% my own.


Wednesday, November 5, 2014

The Homestead: How to Rehab Prefab with New Lighting

This post is sponsored by Wayfair. Thanks for supporting this partnership! All thoughts and opinions are 100% my own.

When we moved to our new home a few months ago, like most busy new homeowners, we were overwhelmed with all of the musts. Like putting in a working stove, and updating the electric. You know the little things that you need to get through the day! Six months in and we are still hard at work with the renovation, but things are slowly starting to turn toward the details. This past weekend I finally had the time to do a little rehab on a prefab mushroom light in our hallway.


As you can see above, our hallway is a unique space. Part library, part major artery, it's been necessary to keep things minimal and simple. We painted the entire home Benjamin Moore Decorator's White, and this decision was a game changer in the hallway. You would think a flat finish, bright white paint would be the kryptonite to a house with a working studio, toddler and dog, but a quick run through with a magic eraser and things look brand new. The lighting fixture in the hallway was one of those prefab mushroom lights that you often find in recently purchased homes, and rightly so. They are affordable, simple, and work well for painting, redecorating and construction. In short, they are no frills and work just fine in the interim. 

To replace the light, I wanted to keep with the library theme and also give a nod to the ceiling fans in both my studio and our bedroom, which have old fashioned school house globes. I found this great fixture on Wayfair, that is a near match to the shape and style of our ceiling fan fixtures. I loved it immediately and like how it keeps with the Nordic and modern feel of our home while including a vintage vibe. 


Next on my list is to find a nice little lamp to place on the open shelf in the hallway. We often play puzzles and read in this cozy little corner and a lamp would be a welcome addition. I'm considering a few below, what do you think? 

1 | 2 | 3 | 4


To celebrate one small corner of the homestead being nearly complete, Wayfair is generously offering Zelma Rose readers 15% off all lamps from November 6 - 10! Get your prefab rehab game on with the coupon code below!


Happy Renovating!

xoxo

Lisa


Original photography, art direction + styling for Zelma Rose by Lisa Anderson Shaffer.


This post is sponsored by Wayfair. Thanks for supporting this partnership! All thoughts and opinions are 100% my own.

Monday, October 27, 2014

Good Measure: The Sharp Dressed Man

As you know, I offer up a lot of fashion tips and advice on the Zelma Rose blog, mostly because you ask, and who are we kidding, I love talking style. Today, I'm giving my own personal take on what makes a sharp dressed man.

Zelma Rose Blue Ombre Bow Tie + Pocket Square

I gave an interview with Goods of Record last week and one of the founders asked me, "Why a Men's Collection?" As a woman designer, I get this question a lot. Truth be told, I love menswear. Structured suits, textured knits, leather details, and of course bow ties. It all really appeals to me and when it comes to my own closet, I am often looking for pieces that mimic the attention to tailoring and quality that is so inherent in men's fashion.  Above all else, when I think about noticing a man's dress, no matter the style, it all comes down to tailoring. When it comes to being a sharp dressed man;

TAILORING IS KING

A Collected Gentleman | The Fashitecteur | Dressed to Ill

Isaiah, Jared, and Rob, three of my favorite male fashion bloggers pictured above, take tailoring very seriously. Even in casual looks they know that nothing looks sharper than a proper fit. From pants to shirts, and blazers, even sweaters and t shirts, every look can benefit from a custom fit. Don't be afraid to take in the shoulders, shorten a sleeve, or lengthen a pair of pants. Finding a tailor you like can take some time, but the good news is you only have to search once. Word of mouth is best, but also ask the sales people where you shop. Many stores offer tailoring and can tell you where to find a pro in your neck of the woods. For more about tailoring visit here.

PATTERN PLAY

Outside of a custom fit, looking sharp really comes down to color and pattern. I always notice pattern play and love it when men get creative in mixing and matching pattern. Isaiah, Jared, and Rob are pros at it , but what I love most about pattern play is that mixing it up really lets individual style shine through. Dress shirt and tie combos are great places to mix pattern. Think stripes with plaid or polka dots, even plaid on plaid! Mixing pattern can be playful, outlandish, classic, and modern. No matter the look, letting your individuality shine through always looks confident, and that's the key to killer style!

Dress Shirts Pattern Play at Paul Fredrick

OWN IT

One of the many things I've learned from my customers over the years is that when it comes to looking sharp you've simply got to own it. One of my favorite things about living in Northern California and catering to the bohemian and unique style of my customers is that the very same bow tie can be just as effective on a tattooed bike messenger as it is on a financial district VC. As long as you own your look, I'll consider your style to be razor sharp. 


Zelma Rose Bow Tie

There are a million so called rules out there that one can follow to look their best, but I think having style is about following a few simple and straightforward ideas that you create for yourself. When it comes to my own designs and who I design for, looking sharp is as easy as:

FIT
+
PATTERN
+
OWNERSHIP

then

REPEAT.


xoxo

Lisa


Friday, October 24, 2014

4 the Record: Carly Simon No Secrets

Carly Simon's No Secrets was released in 1972 and pretty much launched her straight to super stardom.  You're So Vain has remained one of those songs that you find yourself and everyone else singing along to on line at the grocery store. It's a classic for sure and few things feel better after a breakup than belting it out in your car. It's definitely my favorite song on this album and when I heard it on Pandora while working yesterday I wished there had been a piano in my studio! Carly's voice is as distinctive as her style and I just love everything about the boho 70's vibe she is rockin' on the album cover. This look could be in the pages of any fashion magazine today and is both chic and comfortable. It had me immediately running for my floppy hat and over sized hobo bag.


Hat + Hat Band | TShirt | Scarf | Bag | No Secrets | Boots | Denim | Poncho | Necklace

My favorite look from this round up has to be the vintage onyx squash blossom necklace. They are nearly impossible to find and if the gift fairies are listening, the answer is yes please!

What are you listening to?

xoxo

Lisa


Wednesday, October 22, 2014

Local Love: Home of the San Francisco Giants

I think you all know by now that I LOVE baseball. I was fortunate to grow up going to games with my Dad, Mets and Yankees, and if I had endless hours to fill my day they would be all spent at the ball park.  When I moved from New York to San Francisco in 1997, becoming a Giants fan was an easy sell. The franchise started in New York after all and with the promise of a brand new ball park on the horizon it was a good time to start sharing some of my Yankee pinstripes with the orange and black.


Last year we started a new family tradition around here by going on a tour of AT&T Park, home of the San Francisco Giants, every October. If you are local, or planning a trip to the Bay Area, add taking a tour of AT&T Park to the top of your to do list. Now granted I love baseball, but if you are just a little luke warm on the sport, setting foot on the warning track, sitting in the dugout and walking around the visiting team locker room might sell you on the sport.


Plus, it's just plain beautiful. With sweeping views of the San Francisco Bay, the Oakland Bay Bridge, Treasure Island and pretty much as far as the eye can see, a visit to the ball park offers so much more than just great Giants history.

Not only will you get to see the World Series trophies, but you'll learn why the ball park was built in 5 separate sections, who championed the Giants staying in San Francisco and helped raise privately donated money to build the stadium, and why the green goes deeper than just the outfield.


I think I can speak for all Giants fans when I say we deeply love this team. The last 4 years have been an incredible ride and I am so grateful for all the fun and memories. The Giants embody all the things I love most about baseball. They work hard, play hard, and just like Travis Ishikawa's walk off home run in the NLDS, they provide us with inspiration and celebration. While I will root root root for the Giants in the next few days, no matter the result I will be proud to call the orange and black my home team.


Good luck boys!

xoxo

Lisa


All photography by Lisa Anderson Shaffer for Zelma Rose

Monday, October 20, 2014

Good Measure: Fan Gear

The San Francisco Giants are going to the World Series. I'm a huge Giant's fan, so my October is looking pretty good. Truth be told I've had a pretty good run with my fandom. I grew up in New York, went to the 1986 World Series, yeah I was at Game 6, and yeah, it was amazing. Follow that up with the Yankees winning the fall classic a million times in the 90's and you can imagine, baseball was not a hard sport to love.

When I moved to San Francisco from New York, loving the Giants was pretty easy. They were originally from New York after all, and with the plans of the new ball park under way, it was hard not to take notice. Fast forward to 2010, my daughter being born during the World Series, two parades and endless fun later, you can say I bleed orange.

We visited home of the Giants, AT&T Park this past weekend for our annual family tour. I will be sharing the fun with you later in the week, but for now I wanted to talk fan gear. It's not for everyone, but for those of us who just need to show our colors I do have some advice.

Keep it simple. There is a lot of great design happening right now in fan gear. Go with something that feels right and can become part of your regular weekend wardrobe. Whether you are in to hats, t's, hoodies, or scarves, you can probably find something you would wear even if it wasn't advertising your favorite team.

One at a time, with exception. Wear one piece at a time. Keep it to a hat or a shirt or a jersey. The exception being of course if your team is in the World Series. Then just go crazy and wear it all at once. It's the freaking World Series and it's great.

Quality. Sure the shirts sold in the parking lot for $5 are great, but chances are the stuff sold in the team store will probably hold up a bit better. This goes for jerseys too. If you are going to wear a jersey, wear a jersey. Get the nice one for the big bucks like the players wear. That's the whole point right?

I picked up the sweet shirt above at the Dugout store yesterday. It's bright, super California, and just what I need to get me through the Series.

It's October. I'm obsessed. All hail baseball.

xoxo

Lisa

Friday, October 17, 2014

4 the Record: Talib Kweli Eardrum

Talib Kweli, Eardrum always remains in heavy rotation. I once had it in my car for a year without removing it from the CD player. I have loved it since it's release and this album is a go to when I want something to get me through the afternoon funk. Talib remains one of the most thoughtful artists out there. Lyrically he offers complex and beautiful rhymes bringing a new sound and perspective to familiar themes. I pretty much love everything about him.

Sunnies | Headphones | Sweatshirt | Beanie | Eardrum | Backpack | Denim | Ring | Kicks


My favorite song on this album has to be Give 'Em Hell. What can I say, I'm a sucker for a sweet hook. 

What are you listening to this weekend?

xoxo

Lisa

Wednesday, October 15, 2014

The Homestead: The Wayfair American Made Custom Upholstery Collection

Custom Upholstery You Can Actually Sit On

This post is sponsored by Wayfair. Thanks for supporting this partnership! All thoughts and opinions are 100% my own.

The folks at Wayfair just launched a brand new custom upholstery collection. Yeah, it's pretty exciting to be able to order custom furniture from home at 4 am, but what's even better is that true to Wayfair this new collection comes at a more than fair price and the best part is, it's made right here in the USA. Better yet, to celebrate, Wayfair is offering Zelma Rose readers 10% your custom upholstery purchase!!


Wayfair is known as having something for everyone and this new collection is no different. I took a look, ordered some swatches and was happy to find a piece that fits right in at the old homestead.


At $599.99 with free shipping and the option to order a bunch of free fabric samples the Addison Slipper chair kind of had my name all over it. The clean lines, straightforward design, and height from the floor made this chair a favorite and perfect for a quiet corner of the home. With the variety of available color and texture options I was able to find something that meets my laid back boho style and can withstand a lot of creative uses. And by creative uses I do indeed mean spills, possible dog vomit, and of course magic markers. Never a dull moment.


1 | 2 | 3 | 4 | 5 | 6

I think this little collection has reading corner written all over it. And whether that means an actual reading corner, or a new place for the dog and kiddo to cuddle up, I'm cool either way. Happy shopping!


xoxo

Lisa


This post is sponsored by Wayfair. Thanks for supporting this partnership! All thoughts and opinions are 100% my own.


Friday, October 10, 2014

In the Know: Mastering the Art of Email

Email is amazing. Running the show at Zelma Rose and being able to stay at home with my daughter would be completely impossible if I were not able to communicate with customers at 4 am. Seriously, the internet and email has made it possible for me to have it all. I bow down to you oh glorious internet overlord!


For those of you who don't know, before I became boss lady at ZR I was headed down the path to becoming a psychoanalyst. Yeah, Freud and the couch, the whole big mess. I still love psychology, specifically psychoanalytic theory and believe it or not, many of the ways I run my business are seen through a psychoanalytic lens and email is no exception.

Email is such a huge part of running a business and I'm not talking email newsletters and catching up with your inbox. There is something entirely special and unique about being able to communicate with another person without being in the same room or on the phone. Think about it, in an email you get to communicate exactly what you need to without interruption.  It's magic. You can take the time to really read a customer's concern or a team members question to completely hear them. Email allows us to stop time and remove the emotion of physicality and there is no other form of communication that allows for this as successfully as email.  This is huge people!!!

Now I do have quite a bit of experience in understanding communication, I would have to right? And my psych training does come heavily into play in terms of having successful communication with customers and clients, but the good news is that mastering the art of email communication is something that everyone can learn and I'm all about sharing my tips with you! That's right, so go ahead and put on your Freudian slip and join me over at Makeshift Society Tuesday night for my new class dedicated to helping you have stellar customer relations, better management skills, and complete email confidence! To check out some of my psych thoughts on email you can head on over to here and here.  In the mean time go ahead and check out the class listing at Makeshift Society and sign on up for some fun!

Here's to being your own inbox superhero!!

xoxo

Lisa

Wednesday, October 8, 2014

The Homestead: Family Portrait Prep

TIPS FOR NAILING THE PERFECT FAMILY PORTRAIT

This post is sponsored by Tiny Prints. Thanks for supporting this partnership! All thoughts and opinions are 100% my own.

It's beginning to look a lot like fall, which really means that the holidays are right around the corner! If you are a fan of the photo holiday greeting card, your family is probably about to check the annual family portrait session off the to do list. October is a great time to schedule a family portrait. The weather is mild and the time line allows you to order holiday cards and custom prints and gifts from your photos just in time for the holidays.  Our favorite custom cards this year are from Tiny Prints. The hardest part was choosing just one, so we went with four! 


We scheduled our family portrait on the early side this year with friend and photographer Sarah Deragon of Portraits To The People. She snagged some great shots of all of us that will make perfect gifts for family and friends who we don't get to see as often as we would like. It's always a great time with Sarah and it certainly helps when your friend is a professional portrait photographer. But hey, let's be real, the time leading up to your family portrait session, no matter who is standing behind the camera, can be kind of intense. With little ones, there are inevitably wardrobe malfunctions, colds, and unexpected protests. Add in getting everyone in the same place at the same time and it's kind of magic that it even happens! 


To help you get it done and get it right, I pulled together some tips for perfecting your family portrait this year! First things first, it all begins with the PHOTOGRAPHER. When you set out to hire a pro to shoot your family portrait, do your research. Word of mouth is really best. Ask around and think about your family's specific needs. Who is great with babies? Toddlers? Who can get your moody teenagers to put down the phone for more than 2 minutes? What photographers specialize in working with pets? All important questions to ask. Conjure up your inner critic and scout around at portfolios. Some portrait photographers specialize in posed portraits, others, like Sarah, specialize in a more journalistic style. Decide what style speaks to you and can best represent your family. 


Let's talk LOCATION! If you live in a more mild climate like California, you can most likely schedule an outdoor session, but in other places where temperatures might drop a little sooner than they do here, shooting outside can be a risk. Don't rule out a studio session. I know what you are thinking but studio photography has changed a lot since you were in high school and having the promise of perfect lighting and climate can be a good thing especially with small children. That being said, smart pros will offer a few ideas for an outdoor shoot and be flexible if the weather is inclement, knowing nearby places to take it indoors. For our shoot, we chose Fort Point and The Headlands, located on either side of the Golden Gate Bridge for our locales, because really, what could be better?! Yeah I'm a little biased but in all seriousness, They are both special places for us and choosing a grand location also enabled us to create some location based cards and gifts as well. 


When it comes to STYLE think classic and basic. Dressing everyone head to toe in the same exact outfit is good for a gag, but might not be the best way to create a memorable moment. Neutrals, denim, and mild patterns work best. Your photographer will be able to tell you what patterns to stay away from and what colors will get washed out. We kept it basic in denim and grays allowing for our location and emotion to be the focus of the portraits. 


Last but not least have some FUN! No matter the drama leading up to the moment, let it go. Remember why it is important to have this moment frozen in time and have some fun with it. Opt for some serious, funny and heartfelt shots to make everyone in your tribe happy. And worse comes to worst, Photoshop can edit out last minute stains, holes, and rashes!


xoxo

Lisa


Original photography, art direction + styling for Zelma Rose by Lisa Anderson Shaffer.Portrait photography by Sarah Deragon.


This post is sponsored by Tiny Prints. Thanks for supporting this partnership! All thoughts and opinions are 100% my own.